
You may be reading this if you have recently received an email from Microsoft prompting you to take action and upgrade your basic SKU Azure Load Balancers to the standard SKU. This is due to the retirement of the basic SKU of this service due on 30th September 2025. Yes, that’s 3 years away at the time of writing but something you will want to prepare for and take action on well before you are forced to.
Microsoft retire products and services quite regularly – you can review these retirement announcements here. This can be due to a number of reasons such as feature, security and performance improvements in replacement products or just down to lack of uptake in a particular product that doesn’t warrant Microsoft maintaining that product any longer.
In the case of Azure Load Balancer, Microsoft have for some time encouraged customers to make use of the standard SKU, this is mostly down to the far better feature support that it offers. The basic SKU does not for example have support for availability zones or private endpoints both of which are recommended for providing secure highly available applications.
What does this mean for those of us who have been using the basic SKU up until now? Afterall, this basic SKU is free of charge with the exception of the small cost of a public IP address for the frontend of a public facing Azure Load Balancer.
Upgrading to Standard SKU
The process of upgrading involves deploying a new Azure Load Balancer resource and moving your settings and public IP address to the new service – essentially a service migration.
Microsoft have provided a PowerShell script (v6.0 is the current version) for automating this process which mostly carries out all the necessary actions however I did notice a few tasks that did not complete as expected and required some manually effort to complete my migration.
The script will first check that your existing Azure Load Balancer public IP address is set to static rather than dynamic. If not, you will be prompted to change this to static before you upgrade as without doing this step you would risk losing your current public IP address assignment and getting assigned a new public IP address.
The script will then proceed to deploy a new standard SKU Azure Load Balancer resource and automatically create the same corresponding settings from the existing resource. Namely, your frontend IP configuration, backend pools, health probes, load balancing rules and inbound NAT rules will all be cloned from your existing resource.
That public IP address I mentioned will be upgraded to a standard SKU and assigned to the new Azure Load Balancer (this should not result in a change of public IP address assignment). Your existing basic SKU Azure Load Balancer resource will still be there and a new basic SKU public IP address will be created and assigned to this resource. You can delete this afterwards once you are happy that it is no longer required.
Although this migration process is relatively quick, there will be some disruption to your services as the public IP address is upgraded and re-assigned but this should only take a few minutes at most.
Inbound NAT Policies
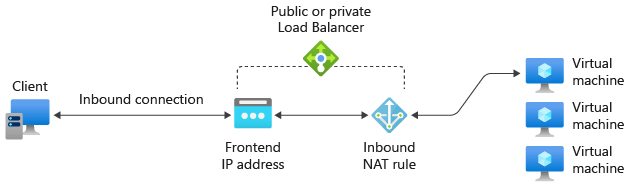
I wanted to focus on this feature particularly as many customers of mine use the inbound NAT rules feature in the Azure Load Balancer to perform a simple NAT/PAT “port forward” service. You might use this to translate a custom TCP port number like port 50000 to port 3389 for RDP for example and then forward this to the private IP address of one of your Virtual Machines. This is something that can be done free of charge by using the basic SKU Azure Load Balancer.
What I discovered with the migration script was in my case although the inbound NAT rule was created in the new Azure Load Balancer, the target of my Azure Virtual Machine was not set correctly. Therefore, the inbound NAT rule no longer works until this is corrected. It’s a quick fix to assign this afterwards but something to definitely look out for if you are using the upgrade script.

Default Outbound Access
As you may know, Azure Virtual Machines by default can NAT out to the Internet directly. This is thanks to a default outbound access public IP address that Azure implicitly assigns to your Virtual Machine in order to facilitate this access. This is not a resource that you create or have any control over, it’s provided by Azure purely for Internet access where you have no public IP address assignment on the Virtual Machine NIC resource.
When it comes to the standard SKU Azure Load Balancer, there is a key difference in that this default access IP address is disabled when the Virtual Machine is part of a backend pool within the Azure Load Balancer. Assuming your Virtual Machine does not have a public IP address associated with its NIC, this means that you will not be able to access the Internet from that Virtual Machine unless you create an explicit outbound connectivity method. This can be achieved by configuring an outbound access rule in the Azure Load Balancer which is a feature that is not supported in the basic SKU.
Outbound rules allow you to provide explicit outbound access through SNAT of the public IP address on the Azure Load Balancer. You can also choose how to configure the allocation of SNAT ports to your backend pool reducing the likelihood of exhausting all available SNAT ports.
The PowerShell migration script will create an outbound access rule for you as part of the migration process but as I discovered only if you had created load balancing rules in your existing Azure Load Balancer before the migration. Therefore, if you were purely using your basic SKU Azure Load Balancer for inbound NAT rules without actually using the load balancing features then you will find that this outbound access rule is not created automatically by the script.
If you need outbound access to the Internet then check that you are missing an outbound access rule in your Azure Load Balancer as I can see this one catching a lot of people out.

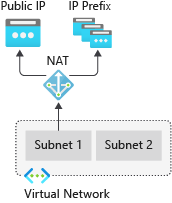
Having said that, there is an alternative approach for providing explicit outbound connectivity and this is the method generally recommended by Microsoft and that is to instead deploy a NAT gateway and route your outbound traffic through this service.
Once you assign a NAT gateway to the subnet where your endpoints are deployed they will automatically route outbound traffic through the NAT gateway service instead of the Azure Load Balancer.
Conclusion
While I would encourage most people to make that upgrade sooner rather than later it is important to understand the differences between the SKUs. Yes, there are a lot of additional benefits with the standard SKU but it does operate a little differently particularly when it comes to outbound access.
There is also the cost difference, it may be a relatively small cost but going from a free service to a paid service especially if you have a lot of Azure Load Balancers (both public and internal) can really add up. If you decide to start introducing NAT gateways at the same time, this will also have a cost bearing.
In short, this will be something that you need to look before the service is retired but it’s worth reviewing your overall solution architecture first before simply jumping in and upgrading blindly.
