
This post is going to be about a new service currently in public preview at the time of writing called Azure Resource Mover. As it’s in preview it is not currently production ready so I would not advise to use this on any production environments just yet. I did however give this a run through on one of my test environments and the results were very encouraging.
What is it and why would I use Azure Resource Mover?
First of all, let’s explain what this service is used for and what it isn’t for. The purpose of Azure Resource Mover is to move (really migrate) Azure resources from one Azure region to another. That’s it….for now at least.
This is not a tenant/subscription migration tool, it is purely for migrating resources from one region to another region within the same subscription. However, by the looks of how they have laid out the tooling I suspect there is more to come here and there will be additional Azure Resource Mover options to follow.
We’ve all done it, accidentally selected the wrong Azure region when deploying a resource only to spot it later. Usually when this happens, you just delete the resource and redeploy to the correct region but in some cases this is not spotted until much later and long after you’ve spent a lot of time configuring systems on a virtual machine.
In these cases, rather than starting again you had a few options at this point such as export disks and re-upload them as page blobs to the correct region, using cross-region backup to restore to the correct region or Azure Site Recovery to replicate disks to another region. The latter two options are only available to supported DR regions, so this was a non-starter if you needed to move for example from Europe to one of the US regions.
Why is the correct region important?
There’s a few reasons here: regional cost differences, regional feature support, latency and data residency. The last two are arguably the most important.
You want to ideally host your resources as close to your customer as possible to keep latency as low as you can so it makes sense to choose an Azure region located geographically close to your customer.
Any data, particularly personal data is nowadays usually bound by data sovereignty regulations and therefore required to be kept within the same geographic region as your customer. A significant example of this would be Brexit, since the UK has left the European Union it would be required in most cases that UK customers keep their data in one of the UK Azure regions. Likewise, EU customers would want to ensure that their data is kept outside of the UK regions but within the EU Azure regions. This is where Azure Resource Mover could come in very handy for long established workloads that now need to be moved.
So what can be moved and what are the costs?
At the time of writing the following resources only are supported by Azure Resource Mover:
- Virtual Machine and associated disks
- Network Interface card (NIC)
- Availability sets
- Virtual Network
- Public IP
- Network Security Group (NSG)
- Internal Load balancer
- Public Load balancer
- SQL Databases
- Elastic pools
- Resource groups
As you can see this is really a virtual machine mover for the most part with some support for Azure SQL also. Resources can be moved to any available public Azure region and can only be moved within the same Azure subscription as mentioned.
There is no cost for the service but bear in mind as this is actually a migration process there will be costs incurred depending on which resources you move. This could be for temporary staging resources, data transfer/egress costs and Azure Site Recovery charges for disk replication.
The process
If you have every used the ARM migration tool for migrating classic Azure resources to ARM then you will notice similarities in this process. They both have the same validation, prepare and commit phases involved. New resources are created in the target region in parallel with the original source resources. Once you have committed the resource move, you would usually want to delete the original source region resources in order to avoid charges relating to these.
We start by searching for ‘Azure Resource Mover’ in the Azure portal, and click the ‘Get Started’ button. First thing to do is select your subscription and your source and destination regions. Remember, you can only move within a subscription currently. Next, select your resources to move to the target region. Where you are moving virtual machines, you should just select the virtual machine resources here, the tool will later detect all the dependent resources so don’t worry about this here.
Note: Your virtual machine needs to be in a running state to be moved as it will be replicated online to the target region using Azure Site Recovery.
Once you confirm your choices, the tool will set up the move operation for you. You can view the initial resources you’ve selected to move by clicking on ‘Across regions’ and make sure you have your subscription and region filters selected correctly. At this point you want to click the ‘Validate dependencies’ button in order to make sure all dependent resources are detected. If dependencies are detected, you will find a new ‘Add dependencies’ button to click which will add the dependencies to the move operation. This is really a rinse and repeat process until you have added and validated all of the required dependent resources.
In my example, I am moving a virtual machine (and dependent resources) from the North Europe to the UK South Azure region. You will see the virtual machine, virtual network, NIC, NSG, pubic IP address and resource group all listed for move here.
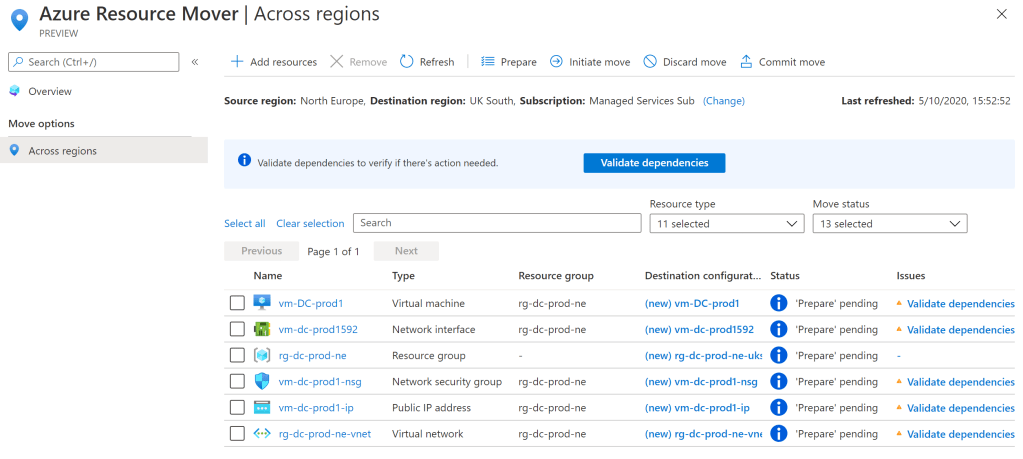
Don’t worry that you don’t see your managed disk resources listed for the move. These are technically not being moved but will be replicated to new resources as part of the process.
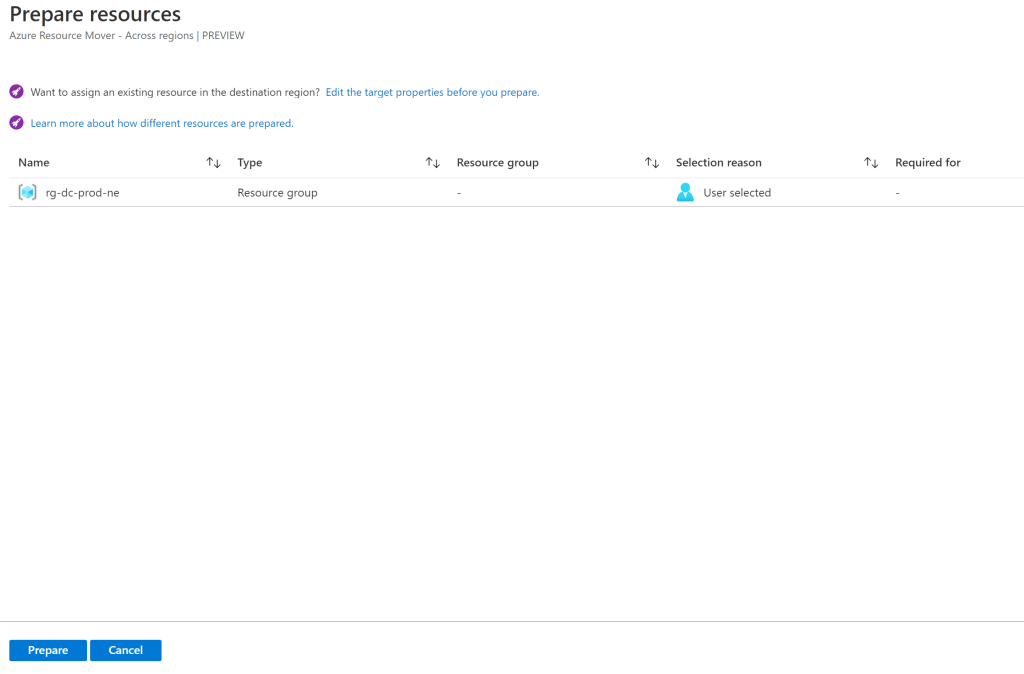
Now we need to enter the ‘Prepare’ stage of the process. Don’t be tempted like I was to select everything at once here as you first need to provision a destination resource group for your move. Without doing this you will receive an error message and can’t go any further. Simply select the resource group resource only and then click on the ‘Prepare’ button in the toolbar. Click the ‘Prepare’ button to finalise this process.
Once this completes, you need to enter the ‘Initiative move’ phase and again select the resource group resource only and click the ‘Initiate move’ button from the toolbar, followed by clicking the ‘Initiate move’ button.
Once this part completes, you will now have a new resource group created in your target region but you must commit the move to complete the process. To do this, again just select the resource group resource only and then click on the ‘Commit move’ button in the toolbar. Click the ‘Commit’ button to finalise this process.
Once the resource group move has been fully committed, you are now able to move the remainder of your resources. Just repeat the same process here, select all resources this time with the exception of the resource group and go through the same prepare, initiate move and commit phases as before.

Notes for virtual machines:
Prepare phase: During the ‘prepare’ phase, the Azure Site Recovery agent is installed on the virtual machines you are moving and the disks will start to replicate to the target region. Data will continue to replicate periodically during this phase. The source virtual machine is still running and can be used as normal at this time. This process can take several hours for the initial Azure Site Recovery replication to complete depending on the number of virtual machines and disk sizes that you are replicating.
Initiate move phase: During the ‘initiate move’ phase, the source virtual machines are automatically shut down and deallocated after a final replication has taken place. Dependent resources are created in the target region during this phase. This process usually only takes a number of minutes to complete.
Commit phase: This is where you need to decide whether to complete the resource move or to discard and rollback to the initiate move pending stage.
Post move clean up
Once you’ve committed your move, you will note that your source resources are all still there. You should verify everything is working OK in your new Azure region and then you will probably want to delete the source resources as these will still incur costs otherwise.
These resources can be deleted in the usual way through the Azure portal or else through the Azure Resource Mover you can click into each resource individually and click delete from the resource properties.
You should then select all of these source resources in the Azure Resource Mover and click the remove button. This removes them from the move collection object which needs to be done before this object can be deleted.
You can then delete all of the temporary resources (recovery services vault, cache storage account and move collection) that Azure created as part of the move process, these will be located in a resource group called: RegionMoveRG-<sourceregion>-<target-region>.
Final thoughts
This process seems to work quite well and I like that it seems to handle all dependent resources as part of a single move operation. I suspect for more complex setups this tool may be quite limited but it will be interesting to see how this develops over time. Certainly once this goes into general availability I can see some real world use cases for where data sovereignty is a concern.
