
Hi everyone. This blog post is part of a great Azure community event organised by Dwayne Natwick called Azure Back to School. Please check out https://azurebacktoschool.tech for some great posts from the Azure community this month. My contribution will be on Azure Lighthouse and with particular focus on how to use this if you are a managed service provider (MSP). Let’s go!

Let’s start with the basics
Each customer will have at least one tenant, this is their Azure Active Directory, their identity management system for Microsoft cloud services. Services like Microsoft 365 and Azure use the identities in Azure AD for authentication to the various subscriptions and services attached to the tenant.
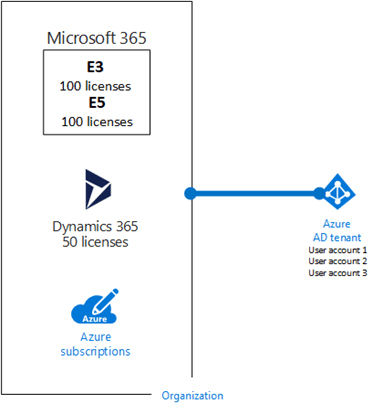
Once a user is authenticated, permissions are authorised through the use of roles. In the case of Azure, we use role-based access control (RBAC) to determine the level of access we want to provide to the Azure resources. More on RBAC a little later on.
If you are an MSP dealing with multiple customers, each with their own tenant then ideally you don’t want to have a user identity created on each of these tenants in order to provide administrative services. In fact, this is bad practice as you are increasing the security footprint by having so many accounts with a high level of access across your customer base.
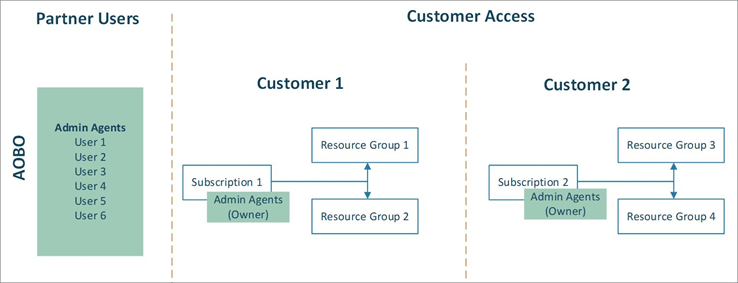
If you are a CSP direct partner then you can use something called Admin-on-Behalf-of (AOBO) to get delegated admin access to your customer’s tenants providing you with admin privileges to perform most tasks on the tenant. This process makes use of an ‘Admin Agent’ role on the partner tenant to provide delegate admin access however there is no way to customise the permissions on this. For Azure, all users with the admin agent role would each have full ‘owner’ access to the subscription(s) which is not ideal.
Where AOBO is not available, for example to CSP indirect partners (where you are buying through a CSP provider/distributor) or if your customers are for example on a PAYG billing model or their own enterprise agreements you can always assign direct access to Azure.
Here, you can create a guest user (external) account on each of your customer’s tenants and provide that account with the required RBAC role(s) to perform the necessary duties for that user. This has its own issues however as it gets very difficult to manage at scale and there is no support for security groups outside of the customer tenant, therefore access to each customer’s tenant must be managed individually.
Managing multiple customers without Azure Lighthouse
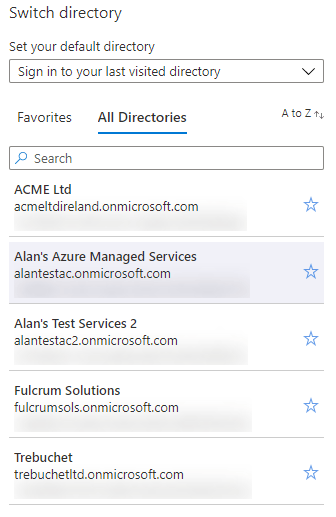
Once you have your access set up, the issue becomes one of scale. If you just have a small number of customer tenants then it can be manageable but the more customers you start to add the more difficult it starts to become. The reason it’s difficult is because each customer tenant is accessed in its own separate context. Even if you have access to all of your customers from the same user account you will need to switch the directory to the tenant of the customer you wish to manage. There is no way to visualise or manage all of your customers from that single pane of glass.
For an MSP, this makes things incredibly difficult as you will want to provide a managed service with active resource monitoring and ideally from a centralised location. The more customers you add the more difficult this will become and trying to apply consistent governance across your customers will be extremely difficult. So how can we get around these issues?
Azure Lighthouse
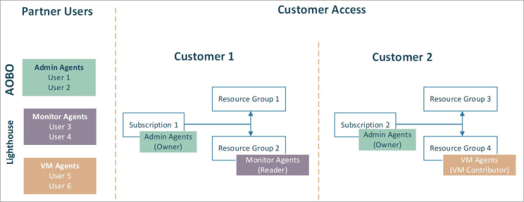
Azure Lighthouse solves all of these problems by allowing cross-customer (tenant) management at scale. Essentially Azure Lighthouse provides granular delegated resource management from your own partner tenant. You can create security groups in Azure AD on your own partner tenant and assign the required Azure RBAC role(s) to these security groups. Access is then delegated to your customer’s Azure subscriptions or resource groups. This means you can have a number of different security groups for staff who have different access requirements and they will only receive the required amount of delegated permissions.
Some examples:
| Azure AD Group Name | Assigned RBAC Role |
| Tier 1 Support | Contributor |
| Tier 2 Support | Reader |
| Azure Backups | Backup Operator |
| Azure Billing Support | Cost Management Contributor |
Going forward this will make managing access much easier as you can simply add or remove members to the various Azure AD groups on your partner tenant that you have delegated the access to.
Onboarding process
There are two ways to onboard your customers to Azure Lighthouse. The first way is you can publish an offer to the Azure Marketplace – this can be made public or targeted privately to just your customer’s marketplace. There are a number of pre-requisite requirements to this method and quite a bit of effort involved so I am not going to cover this here but instead I will focus on the other method which uses an ARM template deployment.
You will need to decide if you are delegating access to a full subscription or just some specific resource groups and then download the corresponding ARM template and parameters file from here. At this point you will want to edit the downloaded parameters file, I recommend using VScode for this.
The parameters that you need to edit are listed below:

mspOfferName – a descriptive name of your organisation, e.g. Fabrikam IT
mspOfferDescription – a descriptive name of the service you are providing, e.g. Azure managed services
managedByTenantId – this is the tenant ID of your partner tenant (not the customer tenant)
Then in the authorizations section you specify the Azure AD groups and the Azure RBAC role(s) assigned to them:

principalId – this is the object ID of the Azure AD security group on your partner tenant
principalIdDisplayName – this is a descriptive name of the security group
roleDefinitionId – this is the Azure RBAC role ID, e.g. contributor, reader etc.
I recommend setting up as many Azure AD groups as you think you will need and defining their permissions in the parameters file. If you need to add more groups later you can but you will need to redeploy the template to each of your customer’s subscriptions again.
Once you have the parameters file ready, then to complete the onboarding process you will need to use either PowerShell or Azure CLI. This can be performed from your own desktop or from the Azure cloud shell. You will need to sign in to the customer’s Azure subscription using an account with ‘owner’ permissions on the subscription. If a customer has multiple Azure subscriptions then you will have to select the subscription required first and onboard each subscription separately.
Below is the syntax for the PowerShell deployment:
# Log in first with Connect-AzAccount if you're not using Cloud Shell

# Deploy Azure Resource Manager template using template and parameter file locally
New-AzSubscriptionDeployment -Name <deploymentName> `
                 -Location <AzureRegion> `
                 -TemplateFile <pathToTemplateFile> `
                 -TemplateParameterFile <pathToParameterFile> `
                 -Verbose

# Deploy Azure Resource Manager template that is located externally
New-AzSubscriptionDeployment -Name <deploymentName> `
                 -Location <AzureRegion> `
                 -TemplateUri <templateUri> `
                 -TemplateParameterUri <parameterUri> `
                 -Verbose
The process usually take around 30 seconds to complete and you should receive a successful message output. At this point you should have access to your customer’s onboarded Azure subscriptions within a few minutes. If you don’t see anything then make sure you are signed in using an account that is a member of one of your delegated security groups. You may also need to log out and back in to the Azure portal.
I’ve onboarded my customers, now what?
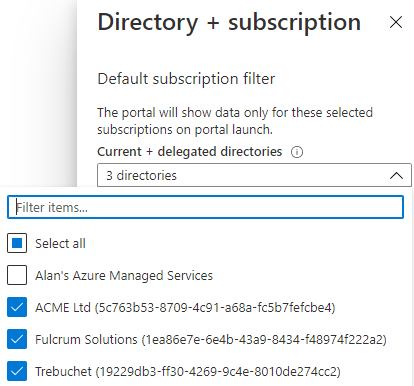
The first thing you should notice is that you now have an additional ‘directory’ filter within the Azure portal. You can select which of your onboarded customer tenants you wish to view and you can filter on subscriptions within those tenants also.
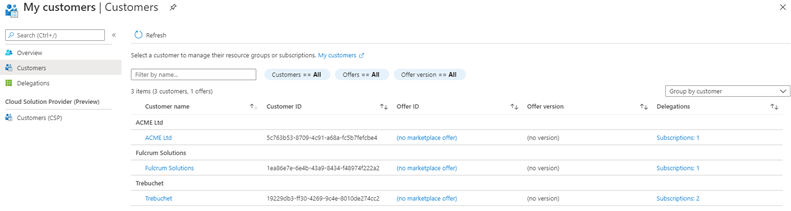
If you search for ‘Azure Lighthouse’ within the Azure portal and click on customers you can see a list of all onboarded customers and the delegated access assignments.
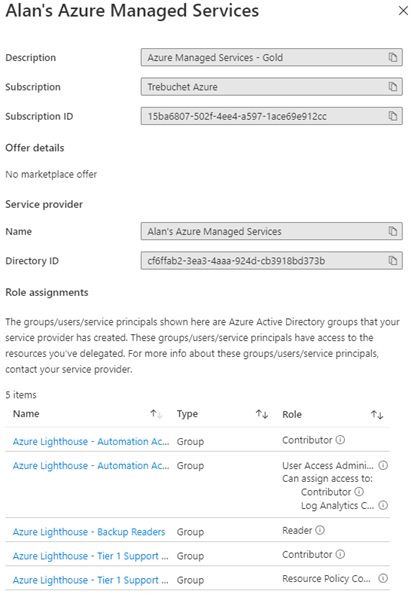
On the customer’s Azure portal, they can view a list of their service providers, i.e. the organisations who are providing them with Azure managed services through Azure Lighthouse. If they have the correct level of permissions they can also revoke Azure Lighthouse access from here.
From this point on, it’s really up to you to make use of Azure Lighthouse as you see fit. You now have a single context Azure portal to manage all of your customers from a central location.
Here’s a few quick examples of putting Azure Lighthouse to good use to get you started:
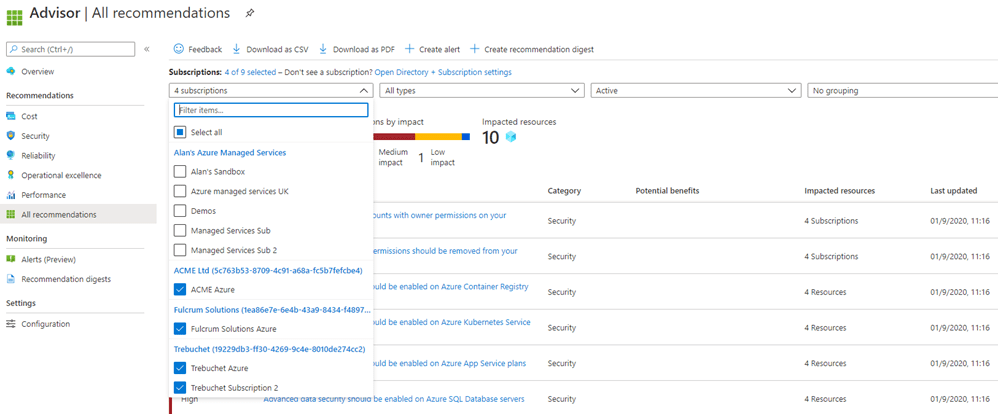
Azure Advisor – get best practice recommendations across your entire customer base from a single screen
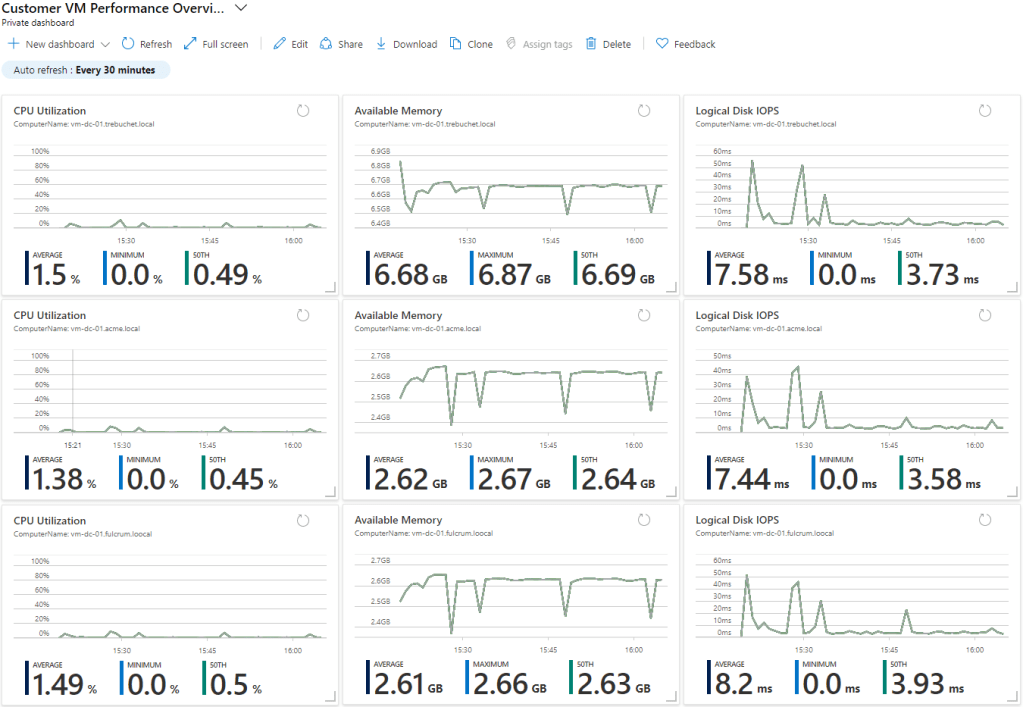
Azure Monitor / Dashboards – Set up custom dashboards to monitor multiple customer workloads and view them at a glance from a single screen
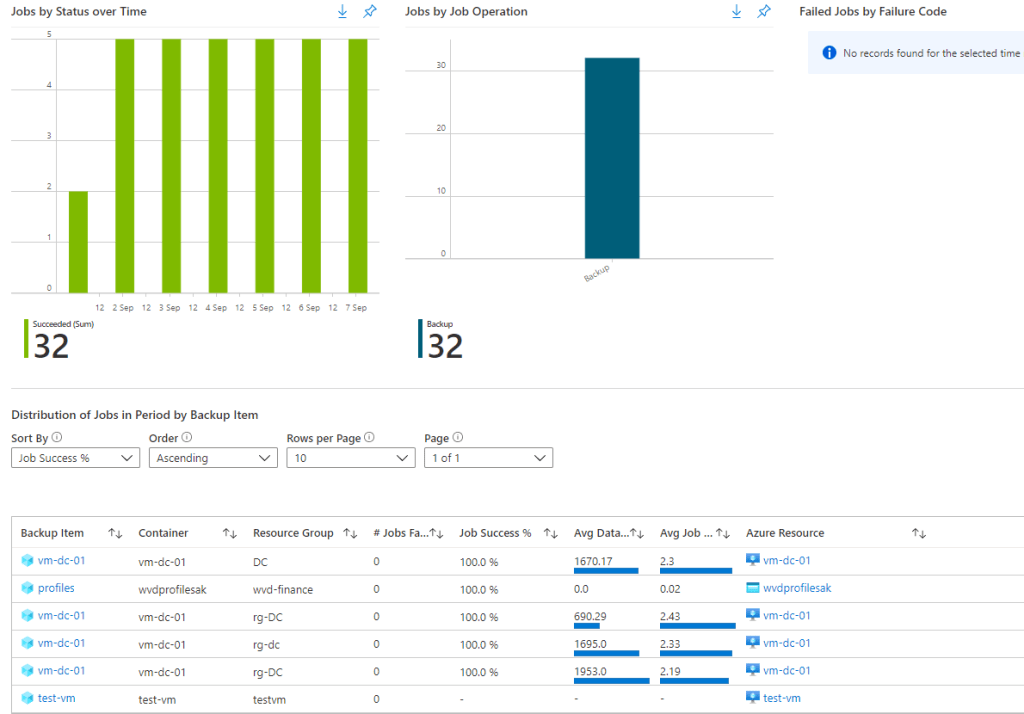
Azure Backup Reports – monitor all of your customer backups from a single screen
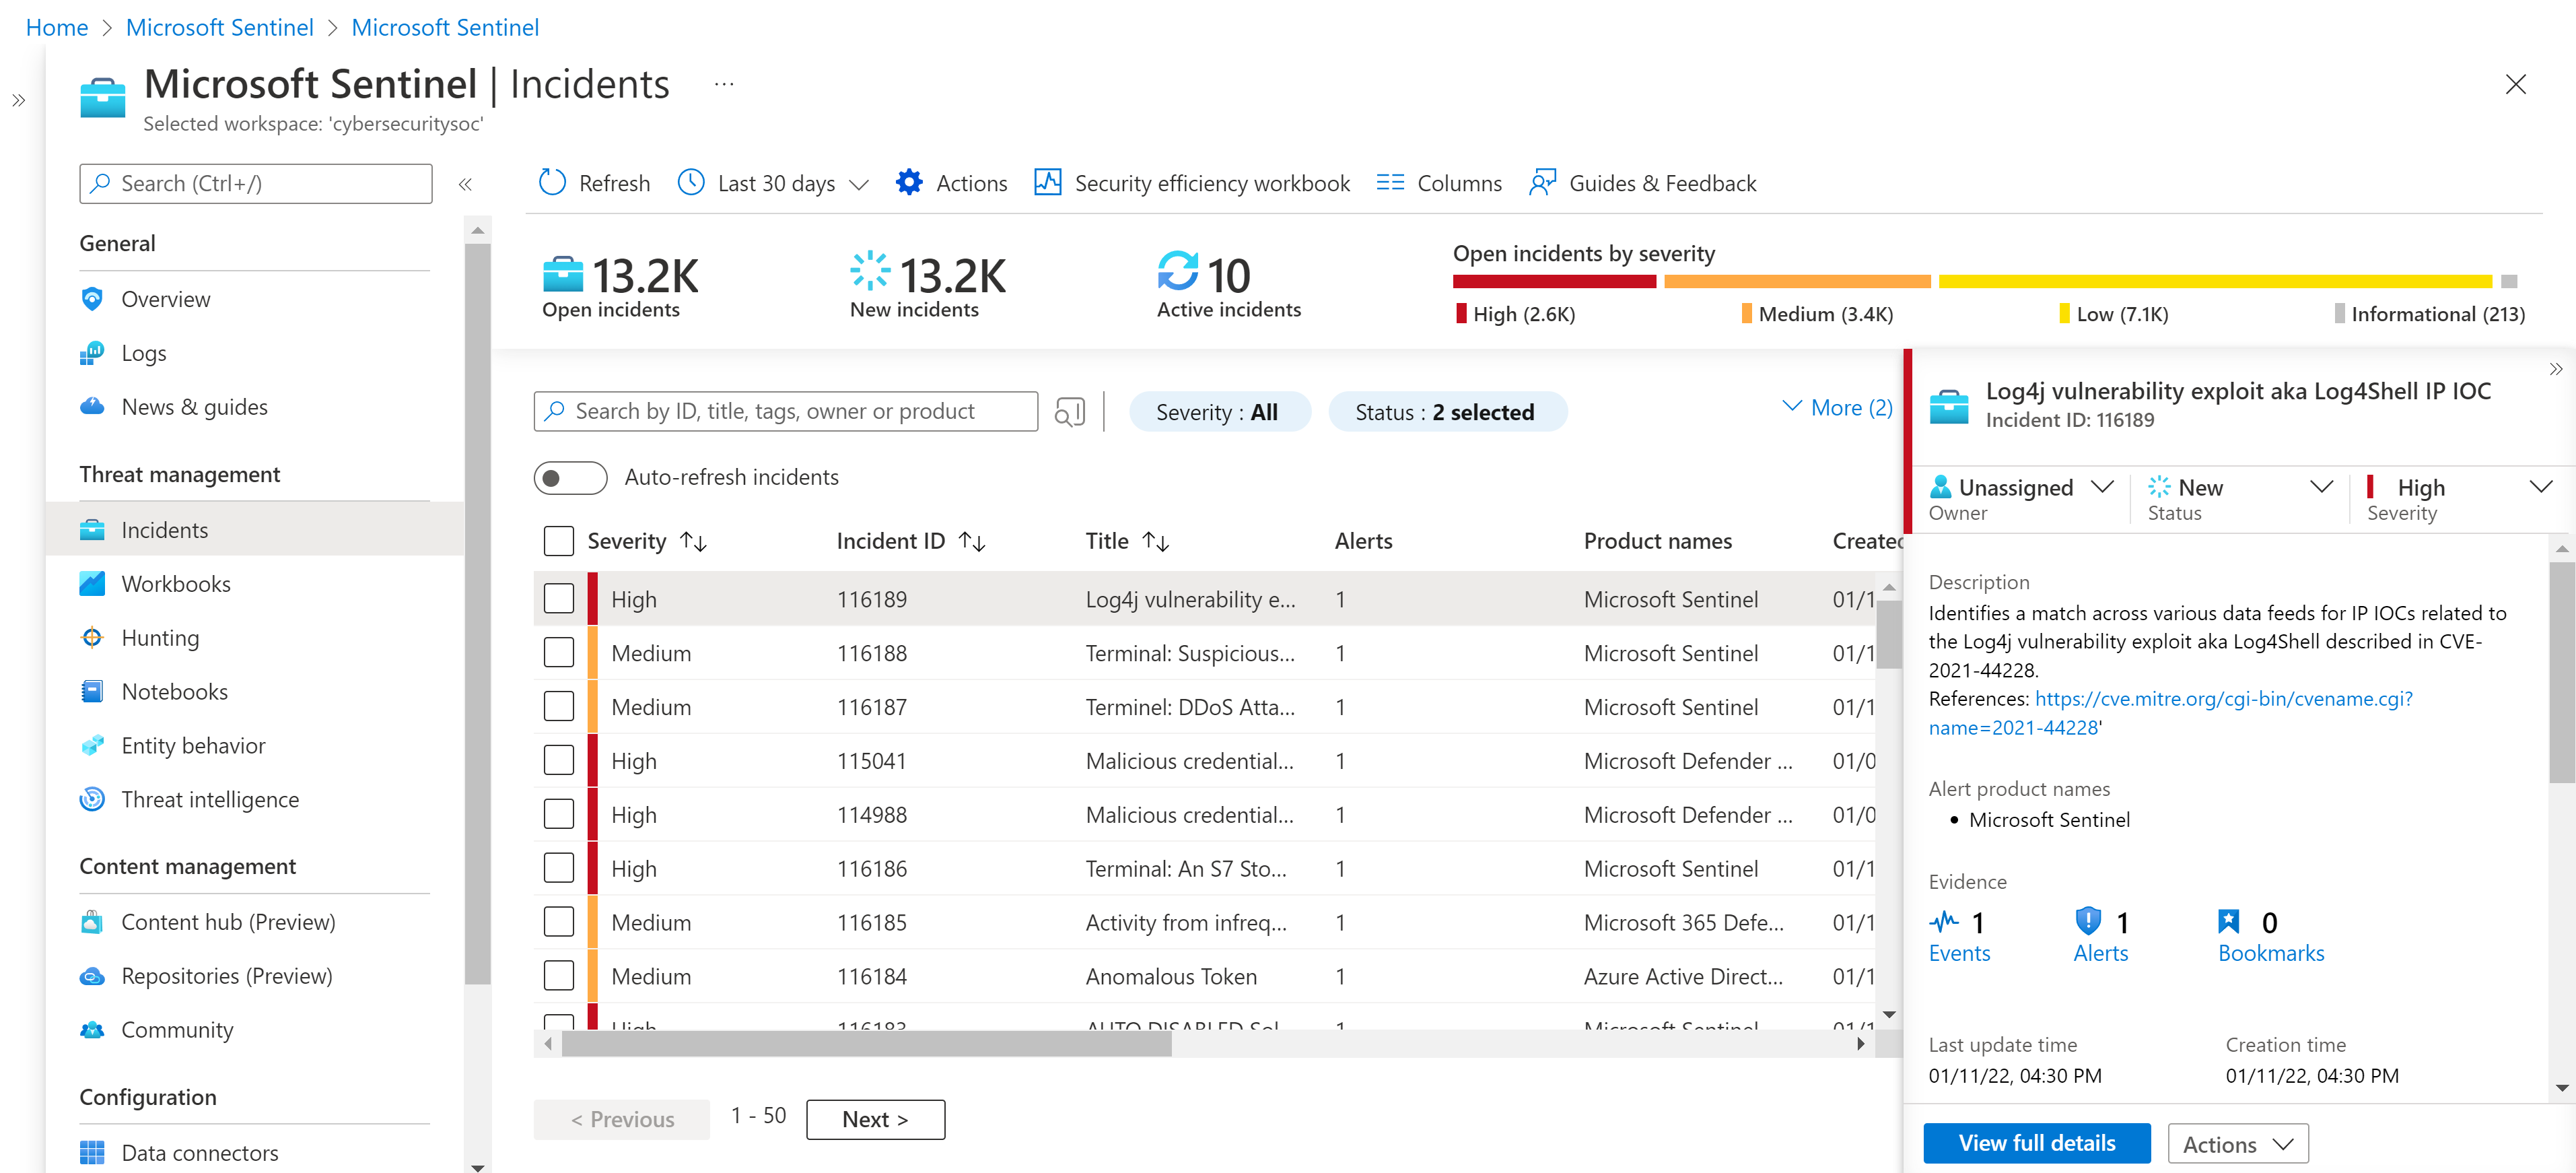
Azure Sentinel – monitor security incidents across multiple customer workspaces from a single screen
With great power comes great responsibility
Azure Lighthouse makes the life of an MSP much easier but you must be cautious about how you use it. After all, you are providing delegated access to each of your customers and if you are providing full contributor level access then it’s essential that you have good governance in place. If you are using the Azure portal for your deployments then it’s very easy to mistakenly select the wrong customer subscription!
Here’s some top tips to reduce the risk of such things:
- Rename your Azure subscription to include the customer name, i.e. don’t have them all called ‘Microsoft Azure’ or similar as it will be hard to distinguish between them
- Make sure you are using multi-factor authentication to secure your user accounts, this is now also a contractual requirement from Microsoft if using AOBO access for CSP based subscriptions
- Use the least privilege principle for your Azure AD group assignments, e.g. don’t add everyone to an Azure AD group with delegated ‘contributor’ access if they don’t require it
- Consider assigning access to resource groups instead of full Azure subscriptions
- Use Azure Policy to insert deployment guardrails and enforce standards across all of your customers
- Consider using privileged identity management (PIM) to enforce just-in-time admin access on an approval/time-restricted basis

One thought on “Azure Back to School: Azure Lighthouse”