
In the past week, Microsoft have released a new feature into general availability that allows you to change the performance tier of managed disks without any downtime to the virtual machine.
Whilst reading up on this new feature I was quickly reminded that there are already some disk-level bursting options available for just this scenario.
- Credit-based bursting. This is similar to how the burstable Bs series virtual machines work. You start with a bucket of credit and where the disk needs to burst, i.e. go above it’s provisioned amount of IOPS or throughput, it will consume the available credit from this bucket. This credit will typically provide up to 30 minutes of burst capacity per day and is provided for free for Standard SSD and Premium SSD disk sizes up to 512GB in size (1TB for Standard SSD).
- On-demand bursting. This feature is in preview at the time of writing but it allows you to trigger additional burst performance on the disk up to a maximum of 30,000 IOPS and 1,000MBps throughput. This feature comes at an additional cost and is available only for Premium SSD disks of 1TB in size or larger.
In most cases, these options are probably sufficient for those bursty disk workloads you might have. The credit based option is suitable for more short-term burst activity where you are using smaller capacity disks.
The on-demand option would be better suited for longer term burst activity for 1TB disks or higher. The on-demand option comes with a fixed monthly enablement fee plus a transaction fee for the amount of additional IOPS or throughput required per minute so you pay for the feature each month even if it is not used.
A new option
If there’s one thing Microsoft like to provide their customers with it’s options. We now have a third option to avail of better disk performance and that is to change the performance tier.
What this does is provide you with the performance of the new disk tier whilst keeping the storage capacity the same. Being able to perform this on the fly without taking your disks offline is a really nice feature to have. The downside here is that if you change the tier then you pay for the costs of the new disk tier so you are paying the full price for the larger disk SKU. Hmmm….well the good news is this does not have to be a permanent change, you can change the performance tier back down to the original tier again once you wait a minimum 12 hour period.
This is a nice new option to have as before if we simply resized the disk we would have had to take the disk offline to perform the change and that action is irreversible. You cannot decrease the size of managed disks in Azure.
This all got me thinking about those cases where you need to overprovision the capacity of managed disks just to reach the performance levels needed – database systems are a good example of this. You may not need much in the way of storage capacity but the performance of a P4 (32GB) disk is not going to cut it.
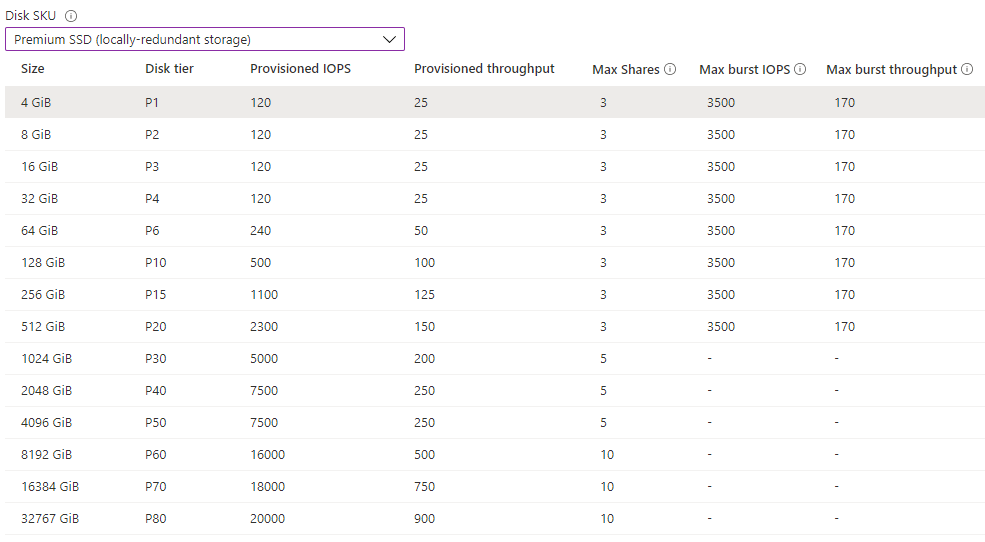
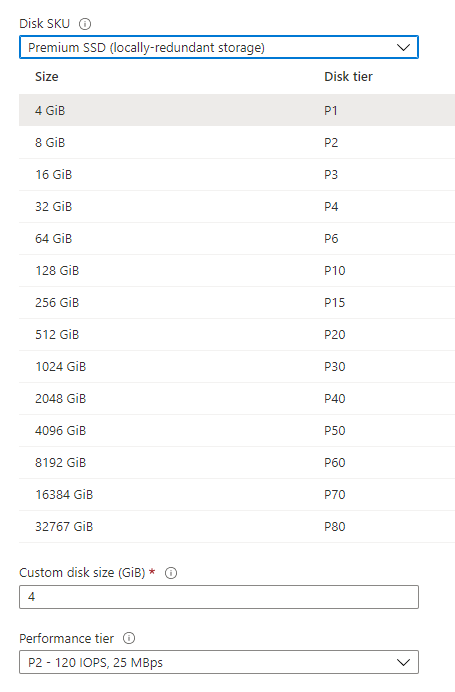
Looking more closely at the managed disk options I noticed the burst capacity for P1 to P20 disks are all the same. A max of 3,500 IOPS and 170MBps throughput.
This is a lot better but you are still restricted to around 30 minutes per day before that free burst credit is exhausted. It will build back up over time but if you need a few hours of high performance to run a batch job for example then you are going to suffer.
Whilst testing changing the disk performance tier I made one important discovery changing the performance tier refills the burst credit bucket!
This was an interesting find, so for example by moving from a P1 to a P2 disk I now had another 30 minutes of free burst credit. I quickly realised just why you can’t downgrade for a 12 hour period as you could easily keep upgrading and downgrading your disk every 30 minutes and continuously use free burst credits for a relatively low cost.
This did get me thinking however, about trying to automate or autoscale a disk performance tier based on usage and available burst credits.
Let’s run through some tests
The first thing you have to do here is to register the LiveTierChange feature within the Microsoft.Compute resource provider, this will allow you to change the performance tier without any downtime.
Register-AzProviderFeature -FeatureName "LiveTierChange" -ProviderNamespace "Microsoft.Compute"
The next thing I did was to provision an empty P1 (4GB) Premium SSD disk on to a virtual machine that could handle at least 3,500 IOPS – there’s no point in doing this on a low end virtual machine that can’t handle the IOPS.
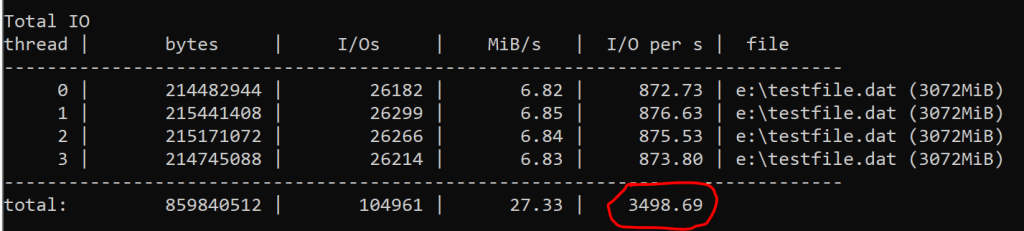
Then I downloaded diskspd.exe and configured a large write operation to the disk that would use all of the available IOPS. If there are burst credits available then this should max out at the burst credit limit of 3,500 IOPS for the P1 – P20 disk sizes.

The results were as expected. The input/output operations per second maxed out at just under 3,500 IOPS.
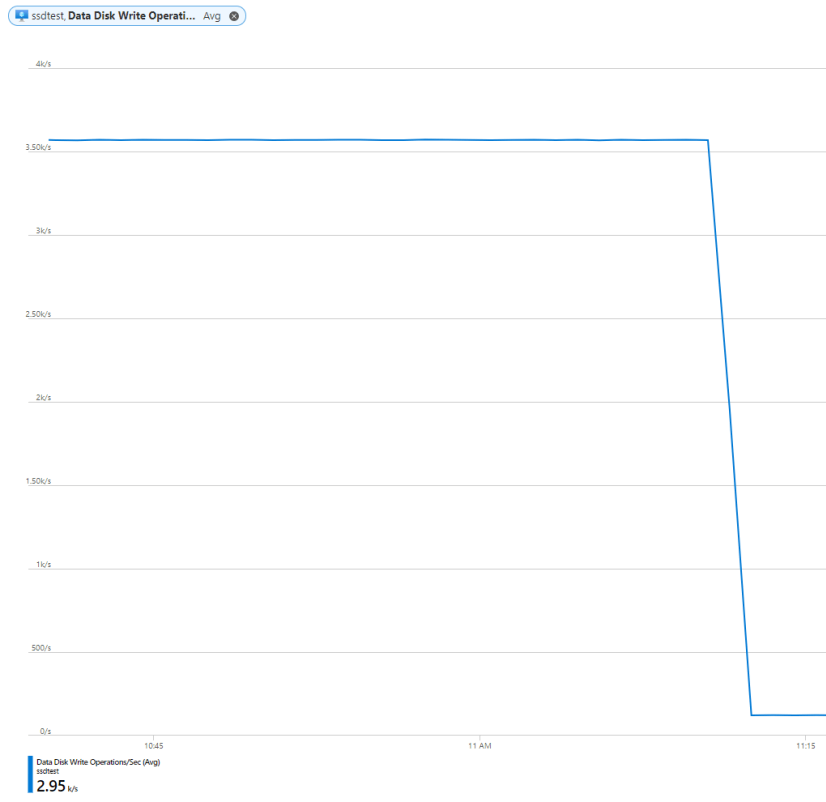
Next, I ran this same test continuously to confirm just how long those burst credits last.
As expected, I reached the maximum 3,500 IOPS for approximately 30 minutes at which point my credits were exhausted and the disk scaled back to it’s provisioned IOPS level which is just 120 for a P1 disk.
Upgrading the performance tier
Although the next tier up (P2) has the same provisioned IOPS as the P1 size at 120 IOPS, it offers the same burst credits giving 3,500 IOPS. By changing the performance tier you will get a full bucket of burst credits which can be used once the performance tier upgrade operation has completed.
Disk performance is back up to the maximum 3,500 IOPS after changing the performance tier to P2.
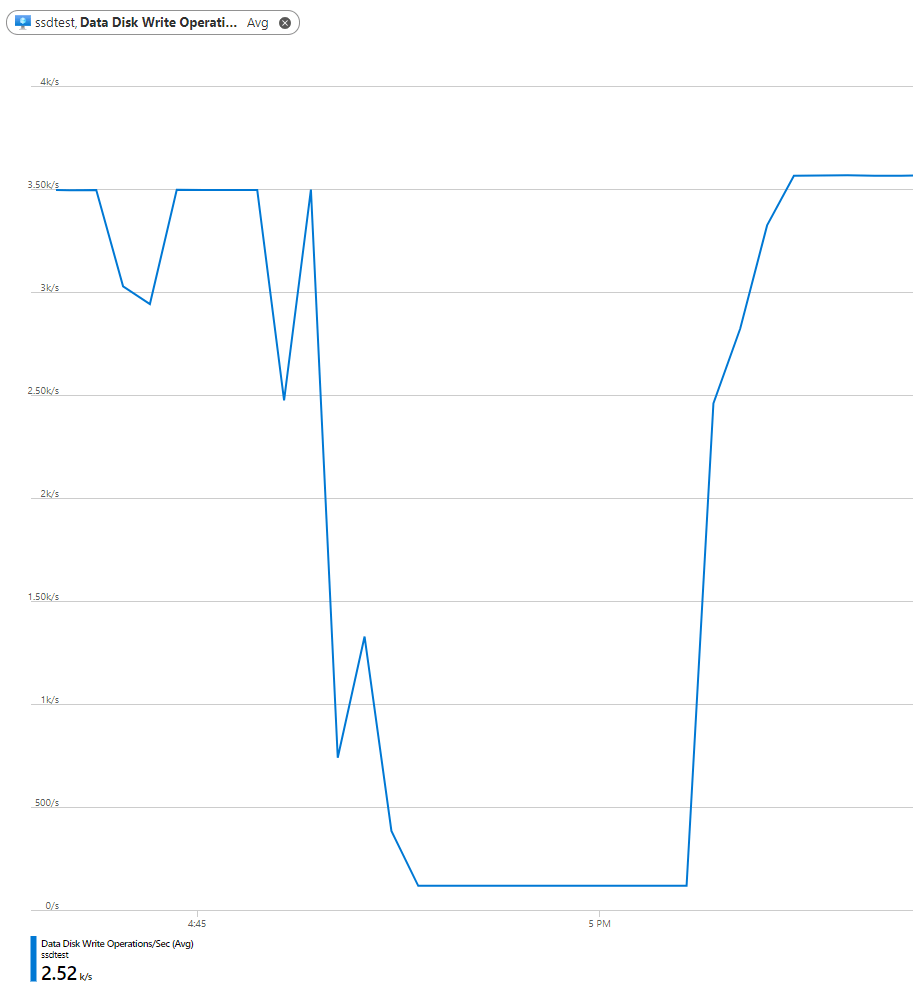
…as the burst credits are replenished due to the performance tier change.
Automation?
So clearly we can track these metrics on the virtual machine as I’ve shown which makes creating an alert rule based on this pretty easy. I wanted to see if I can autoscale my data disk if it was using all or most of the available IOPS but only if my burst credit had been used up.
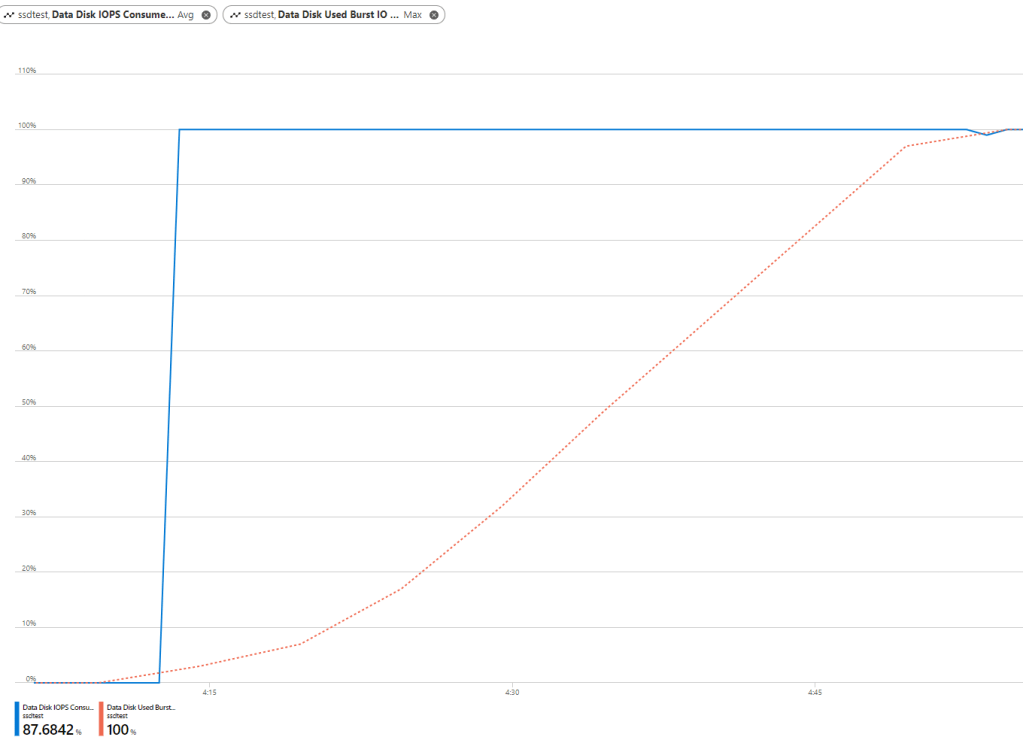
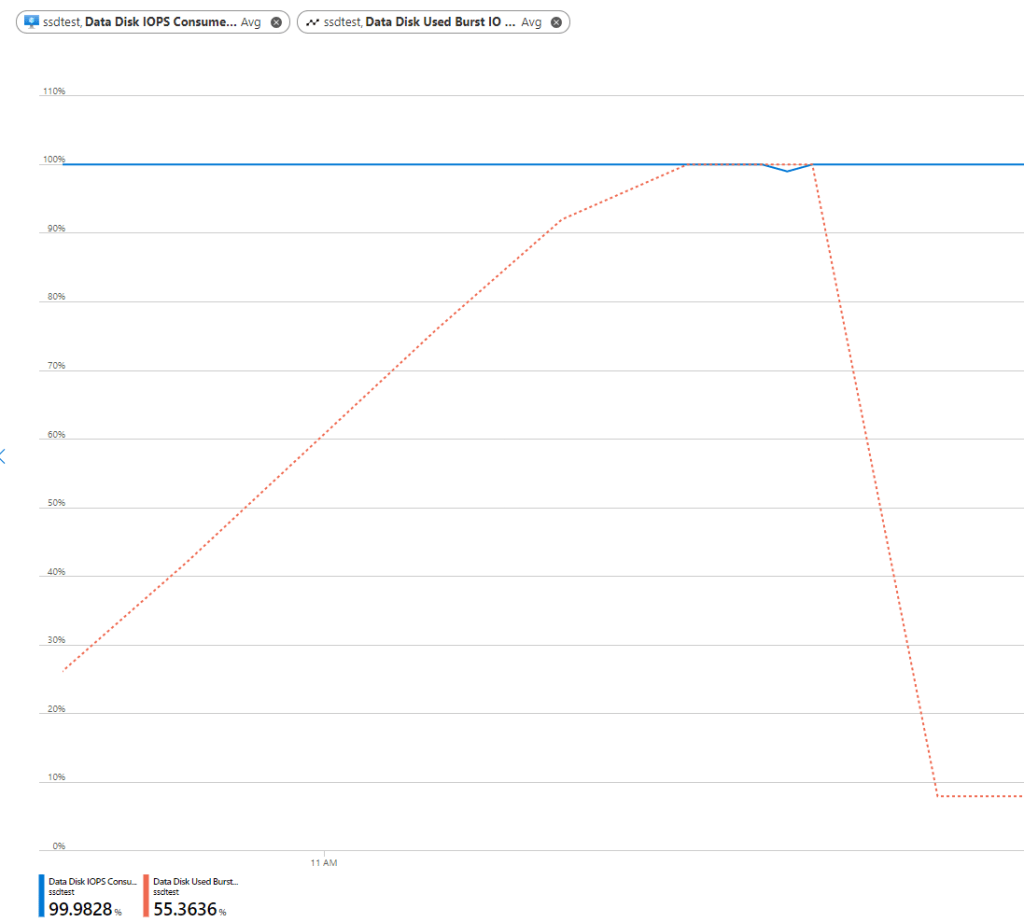
The two metrics I am using here are Average Data Disk IOPS Consumed Percentage and Average Data Disk Used Burst IO Credit Percentage. I decided to set the threshold at > 95% for the first one and > 99% for the second with an aggregation period and evaluation frequency of 5 minutes.

An alert will fire once both of these conditions are met, i.e. when my disk IOPS are above 95% of the available capacity and my burst credits have been exhausted. Firing an alert will trigger a PowerShell runbook from an automation account.
Microsoft provide a great sample runbook to handle alerts from virtual machines so I just modified the relevant section with my logic below.
This runbook will take the first data disk and check its current performance tier and then scale it up to the next performance tier size. If alerts continue to fire then the runbook will continue to upgrade the performance tier as required but I decided to only scale up as far as the 512GB (P20) size as beyond that you no longer receive free burst credits available and are likely to be better off to either use on-demand credits or just provision a larger capacity disk.
# Get the Data disk details
Write-Verbose "Getting the Data Disk Details for - $ResourceName - in resource group - $ResourceGroupName -" -Verbose
$diskName = (Get-AzVM -ResourceGroupName ssdtest -Name ssdtest).StorageProfile.DataDisks[0].Name
$diskTier = (Get-AzDisk -ResourceGroupName $ResourceGroupName -DiskName $diskName).Tier

# Select next performance tier size
switch ( $diskTier )
{
	P1 { $newdiskTier = 'P2' }
	P2 { $newdiskTier = 'P3' }
	P3 { $newdiskTier = 'P4' }
	P4 { $newdiskTier = 'P6' }
	P6 { $newdiskTier = 'P10' }
	P10 { $newdiskTier = 'P15' }
	P15 { $newdiskTier = 'P20' }
}

if ($newdiskTier)
{
    $diskUpdateConfig = New-AzDiskUpdateConfig -Tier $newdiskTier

    # Scale the Data disk up to the next size
    Write-Verbose "Scaling Data Disk from - $diskTier to -  $newdiskTier" -Verbose
    Update-AzDisk -ResourceGroupName $ResourceGroupName -DiskName $diskName -DiskUpdate $diskUpdateConfig
}
Downgrading the performance tier
As mentioned, the catch with changing the performance tier in that you can only downgrade the tier again 12 hours after the last tier upgrade. There will be a lock on the disk and you will receive an error similar to the below.

Obviously you can manually downgrade the disk tier once the 12 hours has elapsed but if you are automating then you might want to consider your options here.
- Have a look at the monitor data over an extended period of time and see if it’s just better to leave the disk on a higher performance tier permanently.
- If you do decide to automate the downgrade process then you could either reverse the logic of the monitor and automation task above or else simply schedule a daily task to change the performance tier back to its original provisioned size.
Conclusion
A recurring theme I’ve noticed from work with Microsoft Azure over the years is that Microsoft are constantly adding more options, more choice. This can be confusing and it really takes experience to understand what the best choice is for any given situation and sometimes you just need to actually try out all of the available options until you find what works best for you.
I always say that choice is a good thing, you just need to understand the differences and I hope this post is in some way helpful to understanding the different disk bursting options that’s are available for Azure.
