
This is an interesting one that has come up a few times with some customers who want to use forced tunnelling through a VPN to Azure for remote workers and NAT out to the Internet using a Microsoft public IP address. This is usually required as an additional security measure for easier user whitelisting through a single static public IP addresses for SaaS applications or potentially for geo-blocking situations.
My usual response is to take a look at the Azure Marketplace for a virtual appliance such as an NVA that supports this feature. This would by far be the most cost effective option but there is also a native option using Azure networking services.
Can’t I do this with a Point-to-Site connection on a VPN gateway?
No. Although forced tunnelling is supported by the VPN gateway by advertising custom default routes, the documentation clearly states that Internet bound traffic is dropped. This is by design.

How can I achieve this then?
Azure Virtual WAN is the answer. You will still have a Point-to-Site connection but routed through a secured Virtual Hub inside Azure Virtual WAN. Essentially, this means you are using Azure Virtual WAN as a virtual router and you will SNAT out to the Internet through a secured Virtual Hub such as Azure Firewall.
A rather complex and costly solution if this is all that you need the service for but I would imagine most organisations will have additional Azure networking requirements that can make use of these services also.

Deployment
Everyone will have different requirements but I will run through the steps involved in setting this up from scratch. Remember, Azure Virtual WAN will handle all the routing and we will use Azure Firewall Manager to configure the secured Virtual Hub element so most of our configuration will be performed within these two services.
1. Deploy a Virtual WAN
This is a quick step. The important part is to make sure to choose the Standard SKU which is required to support Point-to-Site connections.

2. Create a Virtual Hub
This creates a Microsoft managed virtual network that will be used for all of the connectivity that we will be using in this tutorial..
Choose your own requirements in the settings and if you are only using VPN connections then set the routing preference to VPN.

You can configure your User VPN (Point-to-Site) gateway as required at this stage also. This must be configured through the Virtual Hub so don’t deploy any separate VPN gateway resources as these can’t be used.
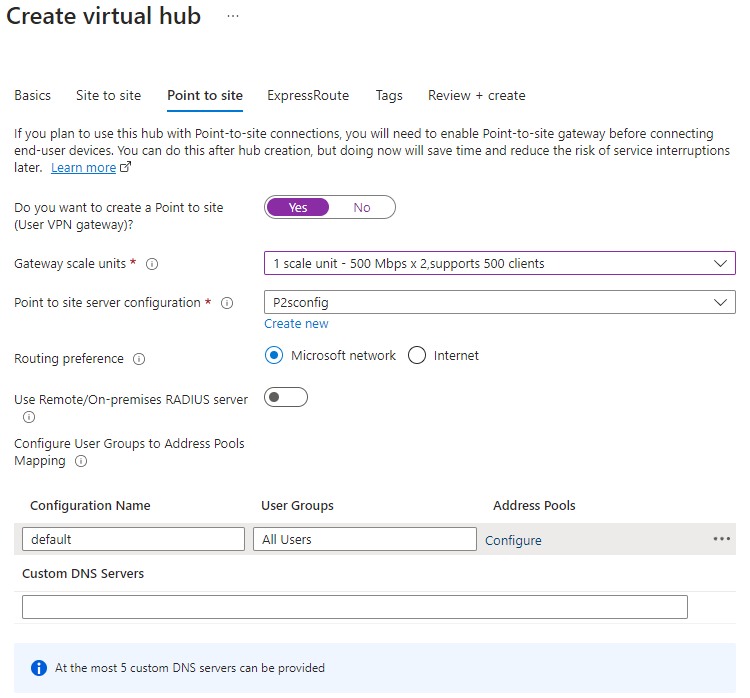
You can also create your Point-to-Site configuration from this blade. I will be using Azure AD authentication so if you want to use this then make sure to include OpenVPN support for this on the basics tab.
More details about how to configure Azure AD authentication for Point-to-Site VPNs can be found here.

Be prepared to wait about 40 minutes for this deployment to complete. This is mostly down to the VPN gateway deployment.
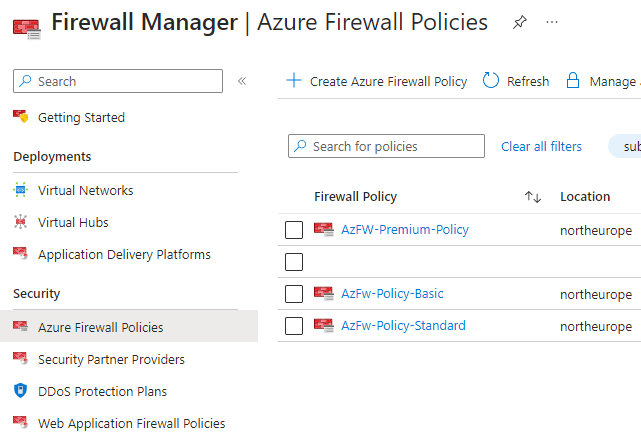
3. Create a firewall policy
This will be needed for the Azure Firewall that you will be deploying via Firewall Manager.
The firewall policy itself can also be created directly from Firewall Manager.
You will need to deploy either a Standard or Premium SKU Azure Firewall as the Basic SKU does not support the required routing configuration that we need to use. Therefore, select the required policy tier that you want and then configure the firewall policy as required.
Note: Azure Firewall denies traffic by default so you will need to ensure that you allow the necessary User VPN traffic to pass through the firewall.
The below is an example of an outbound ‘Allow All’ network rule but ideally you should use more restrictive rules.

4. Add the policy to the Virtual Hub
This is performed again through the Firewall Manager. Just add the firewall policy that you created in the previous step to the Virtual Hub that you created earlier.


This process will create a new Azure Firewall resource and assign the firewall policy to it.
Note my public IP address assignment is: 20.166.67.62

5. Assign the security configuration
In the security configuration section of the Virtual Hub within Firewall Manager, set the Internet traffic drop-down to Azure Firewall and click save.
You will get a warning about the default route of the vWAN hub being updated so that the next hop is the Azure Firewall. This process will take about 10 minutes and will cause downtime for your Virtual Hub.

When this step has completed, make sure the User VPN configuration profile says it is ‘Secured by Azure Firewall‘. If it isn’t, then you can set this here now.

You can also confirm the default route has been modified by checking the route tables of the Virtual Hub.
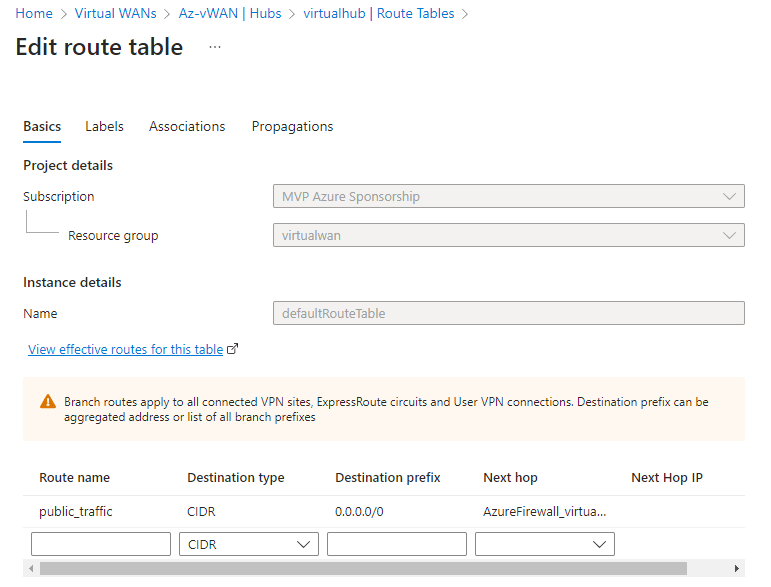
We have now configured all Internet bound traffic on the Point-to-Site connection to route to Azure Firewall as the next hop.
6. Make sure ‘InternetSecurityFlag’ property is enabled
This step may be done already by default but it is a required property setting in order to used forced tunnelling on your Point-to-Site gateway so you should run a PowerShell script to ensure this property is set correctly.
$p2sgw = Get-AzP2sVpnGateway -ResourceGroupName "virtualwan"

Update-AzP2sVpnGateway -ResourceGroupName $p2sgw.ResourceGroupName -name $p2sgw.Name -EnableInternetSecurityFlag
7. Download, edit and import the User VPN profile config file
The final piece is to configure our user’s VPN client but we need to make a small config change to the VPN profile file first.
This automatically generated profile file can be downloaded from a few locations but it is recommended to download the WAN (global) level profile from the Virtual WAN resource rather than the Virtual Hub.

Extract the downloaded zip file and then open the azurevpnconfig.xml file in your favourite editor. You will need to make sure the <version> element is set to 2. This is required so that the VPN client can use the default 0.0.0.0/0 route as otherwise you will only see private routes in your connection’s route table.
Change this item from 1 to 2 if necessary and save the file.

Now, import the profile into the Azure VPN client.
Note: You must be on at least version 2:1900:39.0 of the VPN client to support forced tunnelling.
Now we connect…
Once connected, you should see the VPN connection has a single route of 0.0.0.0/0 indicating that forced tunnelling is in place and all traffic is routing through the VPN connection.

With the VPN connected, if we browse to an IP checker website we can see that our remote user’s Internet traffic is SNATing out through the Azure Firewall’s public IP address.

If you have enabled logging in your firewall then you should see traffic flowing from your VPN client address pool range.

Conclusion
This is a working native Azure solution but just as a reminder Azure Virtual WAN combined with Azure Firewall is not a low cost solution, this will set you back well over $1,000 per month.
Therefore, I would generally only consider this particular setup as part of a larger Azure networking deployment for your organisation or customer.

Instead of sending all internet traffic though the VPN, what if I only wanted to send a specific domain or IP through the VPN, but let the rest of it go through my normal connection?
LikeLike
Haven’t tested but it should be possible by specifying the required address prefix in the VPN config file instead of using 0.0.0.0/0 for all traffic.
LikeLike
so far I have been able to add a includeroutes entry in the vpn xml configuration file in order to force my “special” Ip address through the VPN.
But Ideally I’m looking to be able to set that value not in the config file, but in the firewall or wan route tables… so that it just automatically shows up to the vpn client. no luck as of yet.
even if I replace the public_traffic entry’s 0.0.0.0 with my specific ip address, then on the vpn client only the wan internal ips show up.
LikeLike
Hi Alan, thank you for the write up.
I was investigating the option of us stopping using our NordLayer VPN which costs £200 a month, it gives us forced tunnelling to a dedicated IP (all staff work remotely).
I’ve setup a P2S VNET GW in azure and was upset that forced tunnelling is not an option and all internet bound traffic is dropped even with custom routes added.
The VNET GW itself will costs us £100 a month, following this guide and adding more elements it will easily go over £200 a month.
Are there any P2S forced tunnelling options in Azure which you reckon could beat this pricing?
Tempted to just stop investigating this now and renew our NordLayer VPN.
Thank you,
Sean
LikeLike
Hi Sean, I believe this is the only Azure native option. You would need to use something from the Azure Marketplace otherwise like a Network Virtual Appliance which would come with both Azure costs and license costs. It should work out cheaper than £200 per month from my experience but it depends on the vendor and features that you need.
LikeLike
Can I do this with a s2s vpn connection ? My edge router to Azure. And my LAN devices to have Azure Public IP
LikeLike